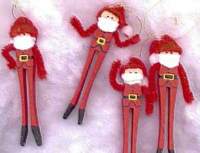
First, I drilled holes through the sides of the pins, under the round 'head' of the clothes pins. You can drill straight through to the other side, or only a little ways in on each side. You can also try gluing the arms on, but I find they work better if you drill holes.
Next, paint the round 'head' of the pin peach or flesh colored. By the time you finish a 'group' the first head should be dry. Paint the whole lower half below the 'head' red. You'll have to wait a little for the bodies to dry. With black paint, or a black marker, paint on some boots - the bottom half inch or so of the pin. Draw on the coat bottom, belt and buttons above where the pin splits. (see photo) Also paint in two dots for eyes. I put a little bit of pink for 'rosy cheeks'. You may choose to paint on the buckle first, since black is harder to paint over, but I just used a few coats of yellow to paint the buckle onto the belt. If you work in groups, like I suggested, when you get to the last in the group, the first one should be dry.
Once you're satisfied with your painting, cut out a small semi circle of red felt. Fold it so the flat sides touch, and glue or sew it together into a hat. Glue a white pom pom onto the end. Cut small moon shapes out of white felt for the beard, and cut the red pipe cleaners to the length you want the arms to be.
Put some glue into the holes for the arms, and insert the pipe cleaners. Glue on the beard, and then put the hat on, trim it so you can see the eyes (and part of the cheeks if you added them) and glue it on.
Now, you can glue the pom pom to the side of Santa's head to keep the hat flopped over, or you can leave it up. Using a sewing needle, thread a piece of gold thread through the hat for a hanger. It's easiest to line your Santa's in a row, sew one thread through all their hats, then cut between the Santa's.
Now you've got a little army of Santa's! You can use stands, hang them, or attach them to gifts. The arms are bendy, so you can shape them, link them together as a little garland, give them something to hold on to, or any of a million other things you can think of!